

Nyla Star - Week 3

It's week three! Yippee!!
I'm so excited to share with you a super loooong blog post. It has 50 photo illustrations. Yikes, right! This one took a while to write up, but I think I have some tips that will help you speed through this block and keep your sanity with allllll those little pieces. *There are two affiliate links where I receive a small commission...they'll show you exactly what product I'm using, though!*
Also, I did not inherit pretty hands, so I was never up for a career as a hand model. I'm sorry you have to look at them, but they make pretty things, so hopefully that's a decent trade off. ;)

Chain piecing the flower sub block
I know these pieces are super small, and the pattern instructs you to mark each little square, but we're going to do things a faster way. I'm sure you're all relieved!
Below I'm putting on a piece of washi tape to mark the center line where the needle is. Use a ruler to align the spot from your needle until the most logical place to end your piece of tape. Make sure the horizontal marks are parallel with any other physical line on your machine. for me, it was the seam between the machine and extension table. Take a pencil and make a small mark along your ruler.

Then place your tape along that line. Make sure it wraps down enough to an area your fabric won't touch, so your fabric doesn't catch it as it moves up to the needle.

Chain piecing the small pieces
This is the point where you may be cursing me, if you're not already. But I promise I'll make it up to you! Check out the photo below to see where the pieces will line up on the corners. See that tape? Align your corners of the 1" piece diagonally with the tape and the needle. Sew on!

Don't cut that thread. I repeat! Don't cut it. Keep feeding those pieces through the machine. Feel free to cut after maybe 20 if you'd like and start a new chain. This is where you'll maximize your time and energy.
When you finish sewing on the first pieces, flip the chain around and continue sewing on the second 1" squares. Don't cut the threads. You'll see why in just a second!

Here's the part I seriously love. Cut the chain so you have a good amount of pieces a little shorter than your longest ruler. Take the chain and align one side of the thread line with a point on your cutting mat. It doesn't have to be precise, just enough that there is a good 1/4" at least on one side of the cutting mat line you've chosen. Lay down your ruler along that line. Double check to make sure you're not cutting any seams.

Take a deep breath (or make a wish if you'd like) and cut along that line. Voila!

Then repeat on the other side. It's so quick!

Remember how we have little threads connecting the pieces together? We can actually take care of this with our rotary cutter. Set your blade just left of the thread and slightly rock it outward, away from the chain (so you don't cut any fabric). Hear that wee, little crunch? That's success. Keep doing that until both sides are cut.

This is a good feeling, friends! Gather up your freshly cut pieces and head back to the machine!

Time to chain up our very last little 1" squares! Are you ready? We'll sew this one up like we did the last, just on one side of the chain. You'll have some 1" squares left over. Don't worry. These are for Block C. Set them aside for next week.

Time to trim again! Line up the chain, lay down your ruler, make a wish, and cut!

Then gently rock your rotary cutter over the connecting threads to separate the pieces.

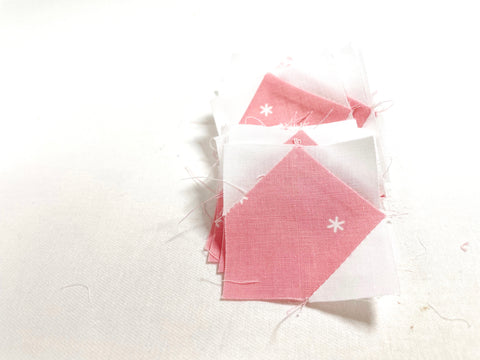
Pressing these little guys are a little tricky the first time, but by the third, you'll have no prob. :) Flip it over to the wrong side and finger press each little piece to the dark side.

Then place it on your ironing board, right side up.

Get a few of them ready to press (maximizing your time with the iron, plus less work for your wrist), then press away!

Aren't they so cute?! Totally worth it, right?

If you can do this, you can do anything! Woohoo!!
Now we'll sew together those cute, little pieces into flowers. Take two pieces and set them down, mirrored. Sew on the side that has both background pieces. The side that does not have that little piece sewn on is the outside edge of the flower. Chain piece them all in sets of two.

I'm not going to have you press here...take two little sets of the flower pieces and match them up, right sides together with all background in the middle. If you're having to sew through colored edges, back up a step and check your work.
Finger press the seams open and match them up before you sew.

See? Aren't they cute? Finger press the seams, then repeat for the rest of the little flower centers. Then take them to your ironing board and press the seams open.

Awww yeah!!! Now the bigger pieces go on! This is the easier part. Chain piece the smaller pieces on two edges on opposite sides of the flower. If the pieces don't quite match up with the length of the background piece, you might be ok! Press toward the background on all these pieces.

Sew on the longer pieces and use the background pieces as a guideline on where to sew. If you do that, you should end up with 6 1/2" square center pieces.

Yay! Aren't they so cute?! I really want to use these cute flowers in other patterns. I just might!

Half-Square Triangles
I might love this part. You can totally zone out as you sew. Turn on that podcast and chain piece away! I'll show you two ways to keep sewing on the right measurement line.
Cluck Cluck Sew Diagonal Seam Tape
This stuff is seriously rad. If you haven't tried it, I strongly suggest picking this stuff up. It's around $7-8. Buy it here.
You'll start out figuring out the straight line with your needle like you did with the washi tape. Mark a little pencil line at the bottom of the point you'll end your tape.
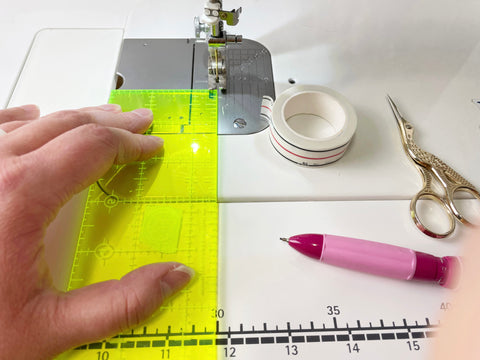
If you have an extension table, use two separate pieces of tape you can smooth down onto the machine so it doesn't catch the fabric. It will last longer this way.

Voila! Now you don't need to mark your squares down the center. you just align the points along that 1/4" line. So slick.

Using a Clover Hera Marker
I love this method, too! Take your ruler and align diagonally on the fabric. Draw a line against the ruler with your Hera marker. Stack up to four pieces at a time and mark in one shot. The impression will go through! Magic! I've never used a pen to actually mark the center. Probably because I'm lazy (sorry).

Ready to sew up these pretties?! Line up your presser foot/points using whatever method above you used. Sew in one, continuous seam until you've sewn as many as you're comfortable with, then cut the thread.

Flip that chain around and sew on the other side. There should be around 1/2" between the seams. Cut the pieces in sets of four...I'll show you the quickest way I've found to trim.

Turn on a good movie or podcast...it's time to trim!
Lay out four pieces on your cutting mat, aligning with one of the horizontal lines. Lay your long ruler down, checking to make sure it's between the seams on all the squares. Put your whole forearm down on the long ruler, then cut in half.

Don't worry about cutting the connecting threads. Flip one chain around so the points are facing away from you. Feel free to use a square ruler or whatever you'd like. My fav tool is the Clearly Perfect Slotted Trimmer. You trim and cut off dog ears in one shot. Move down the line and trim. This trimmer will also help you trim the connecting threads, too! They'll automatically be cut as you trim.

Scoot the freshly-trimmed triangles away from the trimmings and pick them up. Sweep away the trimmings.

Lay out a few pieces in two rows on your ironing board, dark side up. Give them all a little love tap with the iron.

Sorry it's so steamy in the next shot! ;) What I do is pull down the dark point and then smooth my iron down the piece (watch your fingers). While one piece is being pressed, I start pulling down the top triangle corner on the next one. It gets them pressed in a snap. 
Because you placed them dark side up, it automatically presses to the dark side.

Allll done! Isn't it great to have some freshly-pressed pieces all ready to go?!

Assembling the Block
Heck yes! Time to sew up these pretty blocks! Lay the flower sub blocks in the center in one stack. "Deal" out the pieces around the sub block in the design of the block, matching the number of pieces in each little stack to the number of flower sub blocks in the middle. Chain piece the two side pieces, then press and put back (or don't press yet...whatever you'd like!). Repeat with the other side.

This is a little more in-depth tutorial for chain piecing the top and bottom rows. Take the top row and separate from the block. Note them in your brain as stacks 1, 2, 3, and 4.

Take them to your machine, placing stack 1 to the bottom left of your presser foot. Stack 2 goes to the right of your presser foot. Stacks 3 and 4 go to the top left corner of your machine.

Take a piece from stack 2 and lay it RST with a piece from stack 1. Continue down the stack, and don't cut the thread until both stacks run out. Start at the top again, and bring stack 3 over to the right of your needle. Repeat the process, matching your points.

When you've completed stack 3, cut the thread and bring down stack 4. Continue down the stack.

Repeat with the bottom row, too!

Now for the most fun part!! Sew the small side strips on to the flower sub block.

I totally cheated and didn't press...so I'll show you how I did it. I align the center seam of the two HSTs with the seam in the middle of the block. Then I finger press open the seams and clip. I keep pieces I need to keep an eye on, on the top. That way I can ensure the seams stay pressed open as I sew. Chain stitch these, too!

Repeat with the other side.

I know it's awful, but I don't press the top and bottom rows first, either. The pattern may say to do it that way for the best accuracy, but I totally cheat. I figure in patterns, I'll share how to get the best consistent result without major tutorials. Then, in the QAL, you'll see where I cut corners. It may not be "best practice", but it gets it done, and done pretty well.
Finger press the seams open and match them up with the other HST seams. Clip at least two seams in place. The seam in the middle of the row won't matter as much on placement as the outside seams. The middle seam really doesn't need to match up with anything. Still needs to be pressed open though, as you sew. Repeat with the other row.

Pressing your block
As you can see below, some of the seams naturally lay somewhat open because of the fancy finger pressing and clipping we did as we sewed. Take a Hera Marker and open up the seams more, finger press the outer seams. Then press just those.

Then, press the inner seams open as well. Pressing them open will help a TON as the seams will be a little bulky. Quilting them is so much easier if they're not so bulky.

Voila! Pressed blocks! This is the looooongest tutorial I've written with tons of photos. It's been pretty fun, actually. If you're still reading, thank you for following along!
